|

Are you one of those people that organize your personal contacts' information in a spreadsheet, but refuse to enter them into your Microsoft Outlook Contacts Folder manually, one by one? That's because you don't have to!
If all of your contacts are stored in an Excel spreadsheet or CSV (comma separated values) file, importing them into Outlook isn't as hard as you might think.
Here's another practical tip for using Microsoft Outlook...
1. If the contact information is already in CSV file format, go to step 2. If the contact information is stored in an Excel spreadsheet, you will first need to export the data into a CSV file. To export an Excel spreadsheet to a CSV file, simply open the spreadsheet. Make sure the columns have appropriate headings, click on File, and then Save As. In the Save As dialog box next to Save as type, select CSV. Change the name of the file and the folder you are saving it to, if necessary. Then click Save.

2. If the contact information is already in CSV format, you can immediately begin to import the CSV file data into Outlook. First, select File from the Outlook menu bar, and then choose Import and Export... from the drop-down menu.
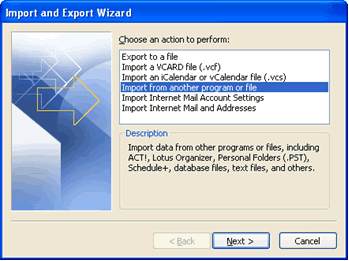
3. In the Import and Export Wizard dialog box, make sure Import from another program or file is selected. Then click Next.
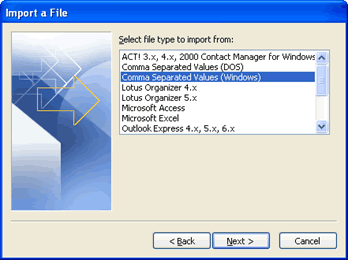
4. In the Import a File dialog box, select Comma Separated Values (Windows) and click Next.
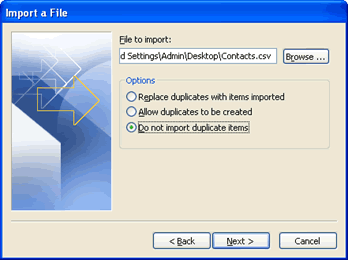
5. In the next Import a File dialog box, click on Browse to find the CSV file, and then click OK. If you do not want to import any duplicates, make sure Do not import duplicate items is selected. Then click Next.
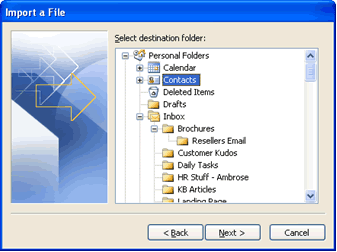
6. On the next screen, choose the folder you would like to import the CSV contacts data into. This is typically your Contacts folder. Then click Next.
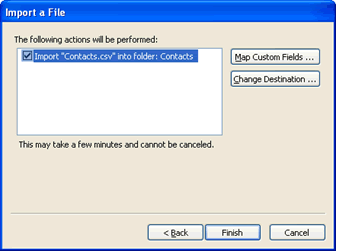
7. On the next dialog box, click on Map Custom Fields....
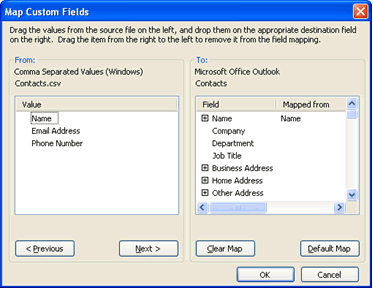
8. The column headers from CSV file should be mapped to the appropriate Contact field name. For instance, Name should be under Mapped from and match the Name field under Value. If not, you can drag any field name from Value onto an Outlook Contacts Field in the opposite box.
9. Once everything matches up, click OK and then Finish. The contacts from the CSV file will now be listed under your Microsoft Outlook Contacts.
Bonus Tip:
Manually mapping values to different fields gives you the authority to assign anything you wish. For instance, if the value in the CSV file is "Mobile Phone Number," but for your contacts this usually means their primary phone number, you can assign it to the "Primary Phone" field in your Outlook Contacts. This helpful hint can be applied to any of the values listed under the CSV file.
Look for next month's newsletter, when we share another practical trick for using Outlook.
© Lookout Software, LLC. All rights reserved.
Microsoft and the Office logo are trademarks or registered trademarks of Microsoft
Corporation in the United States and/or other countries.
|


